Describe the tone. Get the rig.
A desktop app that turns a plain-English description (a song, an amp, a pedalboard, a feel) into a complete, valid rig for your HeadRush floor unit, then pushes it to the pedal over your network. Amp and cab pairing, drive stacking, time-based effects, block order and levels, all decided together instead of one knob at a time.
{{ versionLine }} · Free · Runs on your Claude, Grok or ChatGPT subscription, or your own API key
Say what you want
“Edge-of-breakup AC30 with a slapback and a swell for the bridge.” Reference a record or a rig, or just say how it should feel.
The app builds it
Blocks are chosen and ordered against your pedal's own model catalog and parameter schema, so what comes back is a rig the hardware actually accepts.
Push and play
The app finds your unit on the network, checks it, writes the rig as a new preset and reads every parameter back, and you play. Existing presets are never overwritten.
One window, one prompt, a whole rig
Native SwiftUI on the Mac, {{ electronLine }}. {{ allApps }} carry the same model catalog and the same dark design language, in two themes, Mint and Black Gold, and {{ allAppsLower }} produce the same rigs, each following its platform's conventions for where settings and keys live. {{ allApps }} run the same console, with Build, Rigs, History, Device and Setup down one rail.
Feature tourIt decides everything so you don't have to
Modelling gear buries its good sounds under menus. The app does that digging for you and hands back something you can plug in and judge with your ears.
Plain-language rig prompts
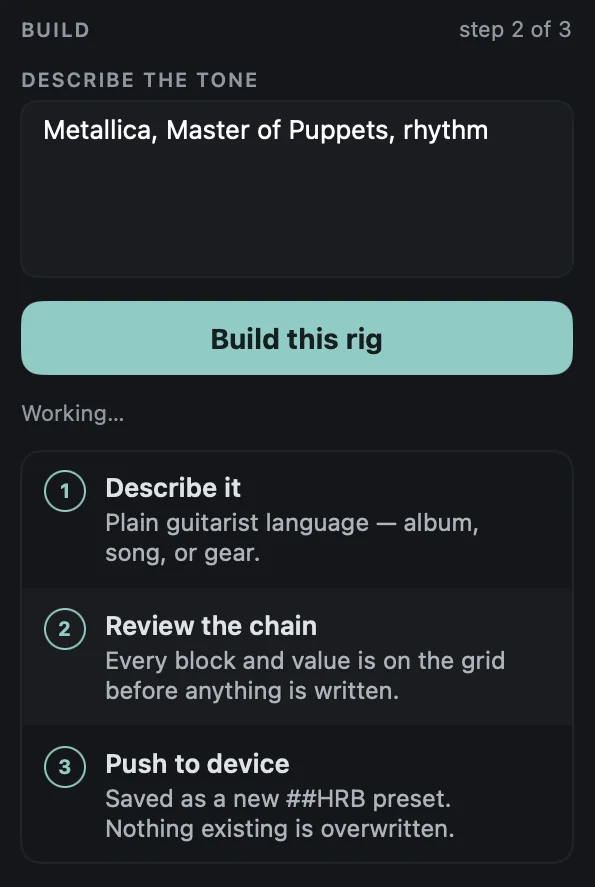
Ask for a tone the way you'd ask a bandmate: “Metallica, Master of Puppets, rhythm.” Genre, era, a specific record, a specific amp; the app does the translation into blocks and parameters.
Whole signal chain, in order
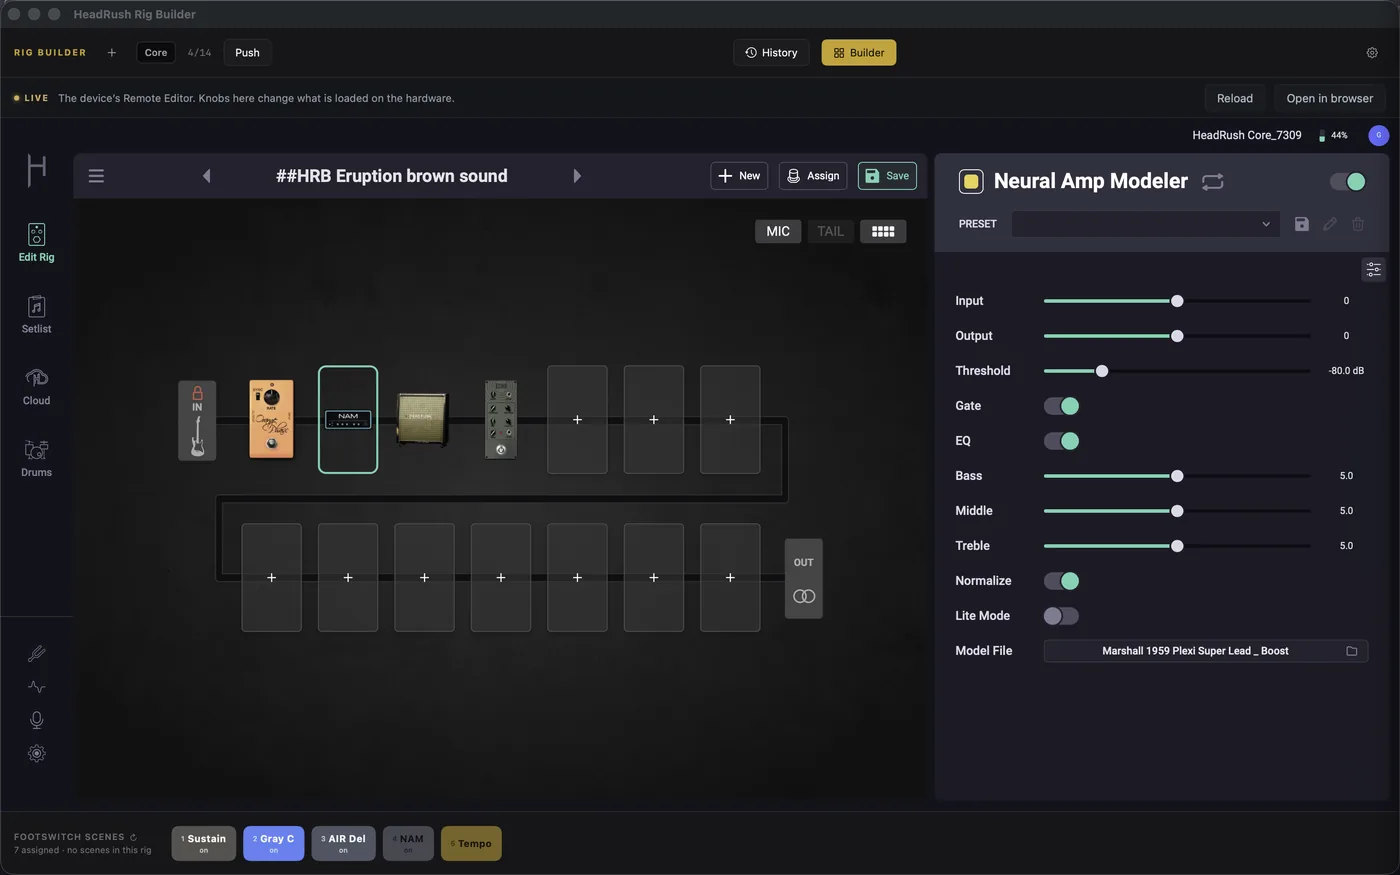
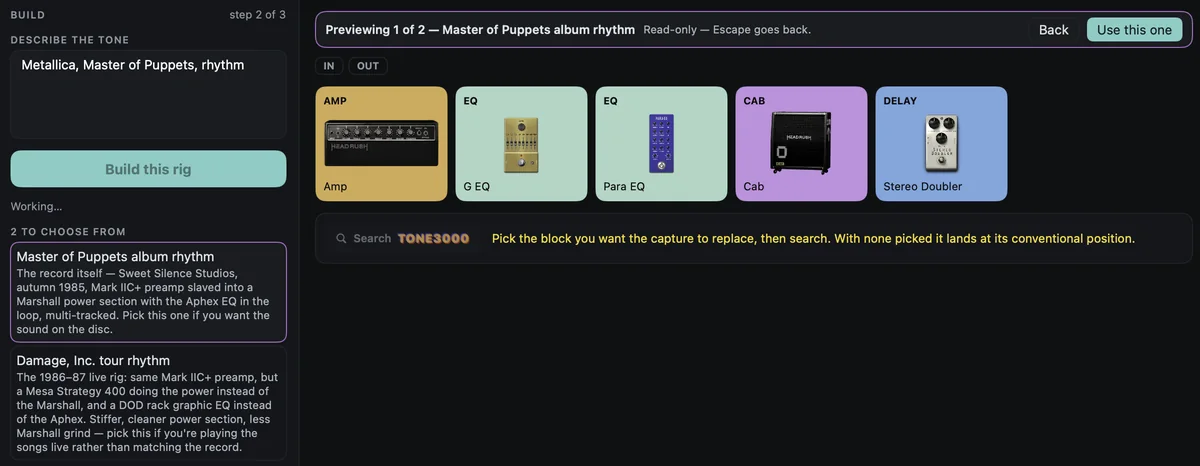
Amp, cab, drive, dynamics, modulation, delay and reverb are picked as a set and drawn as a signal rail, left to right the way signal travels. One card per block, with every parameter the search set and a count of how many of the unit's 14 slots the chain uses. With the unit switched on, each card wears the unit's own picture of that block, fetched from the device as the card is drawn: nothing is bundled into the app and nothing is written to disk. With the unit off, the card keeps its symbol.
Built to what the hardware accepts, and to a standard
HeadRush's published model attributions and the unit's own parameter schema ship inside the app, so “Mesa Mark IIC+ with the mids scooped” comes back as the pedal's actual 85 M-2 Lead. It cannot reach for a block the hardware does not have, and rigs are re-verified before they're staged. The search also works to one written build standard, shared by {{ appsPhrase }}: precision where the role pays for it, delay times worked out from the tempo rather than guessed, and a self-check before it answers.
Sourced from the record
With a web-search-capable backend, the app looks up what gear was actually on the record and tags every claim CONFIRMED, REPORTED or INFERRED, with a source for each. It is forbidden from inventing interviews, quotes or URLs to fill the gaps.
Push straight to the unit
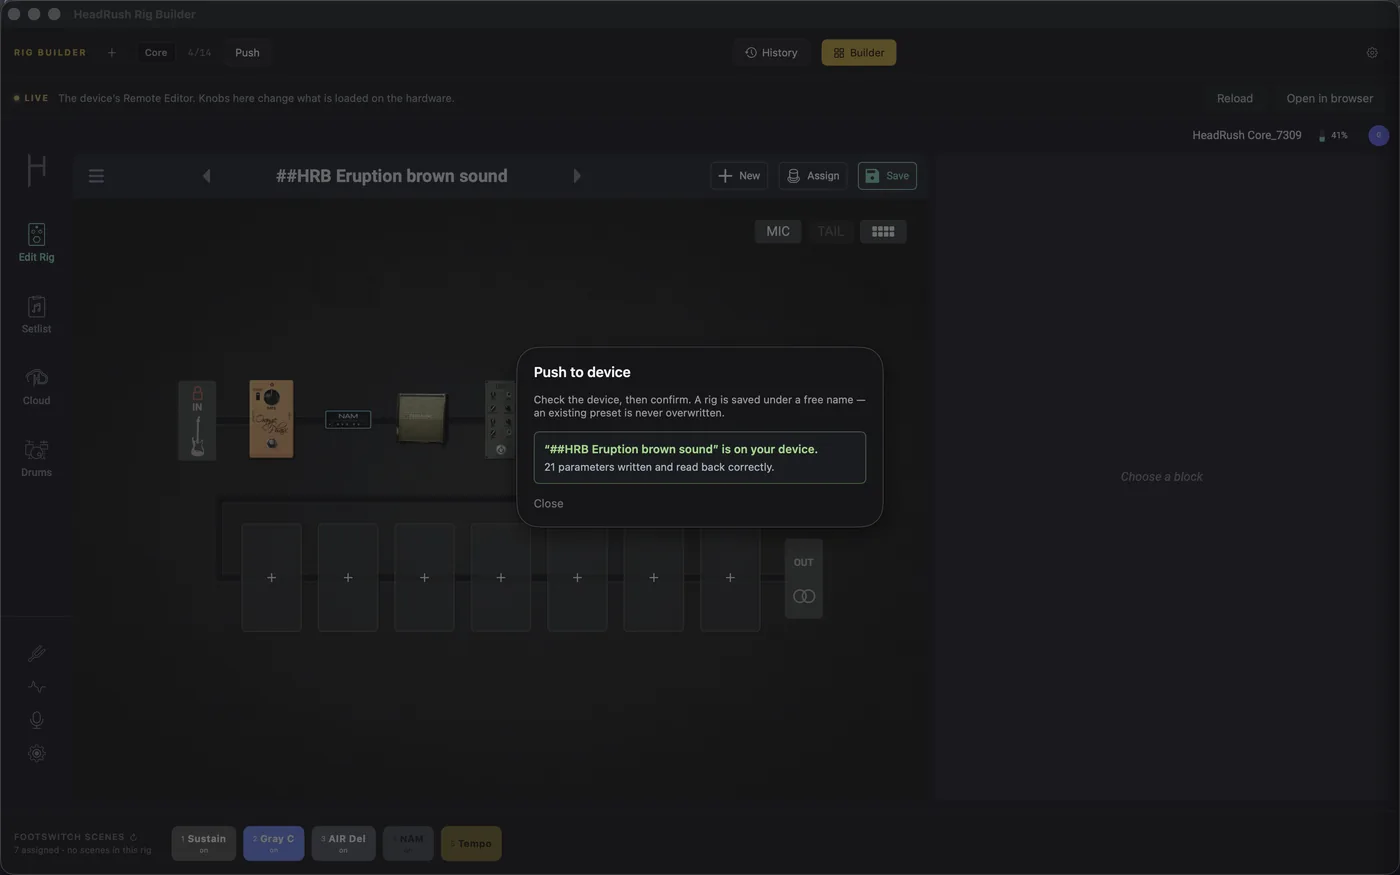
You never move a file yourself. The app finds your unit on the network and writes the rig as a new preset: Push to device, and it checks the unit, builds the rig block by block, saves it and reads every parameter back. On the Mac there is nothing to confirm; Windows asks once, Yes, push it. It lands as “##HRB Name”, or “##HRB Name 2” if that is taken, never in place of anything. The HeadRush Remote Editor lives in the Device panel inside the app for knob tweaks afterwards, and a found rig even names the real amp it identified and offers NAM captures of it via Tone3000, fetched by the unit itself.
Your subscription or your key
Seven backends: the Claude CLI, which is the default and runs on the Claude subscription you already have without a key; the Codex CLI on a ChatGPT subscription, the same way; a Claude API key; the Grok CLI; a Grok API key; a Google key for Gemini; or an OpenAI key. Keys live in {{ keyStores }}. You never create an account, nothing is reported back, and no server of mine sits anywhere in the path.
Footswitch scenes, authored from the console
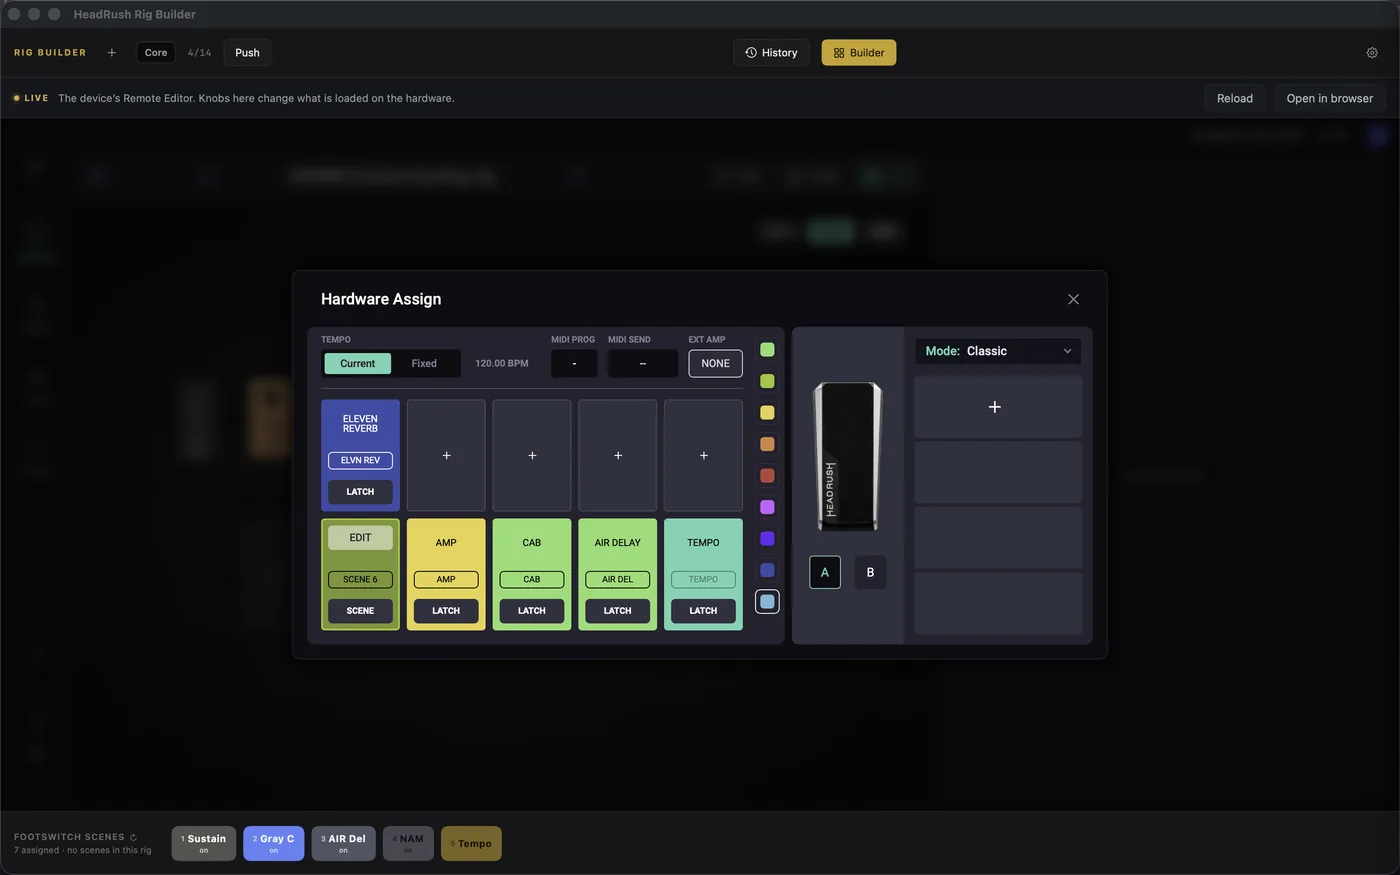
A scene is the unit's own table: ten scenes, fourteen slots, each block on, off or left alone. The app reads them off a rig, draws the real pad layout for your chassis, and lets you author them where you can see the whole chain. Click a pad to pick it. Right-click it to record what the rail is doing as that scene, to rename it, or to give it a colour. Scenes save with the rig, every action can be undone, and Save to device writes them back the way you laid them out, keeping the pad numbers a Hardware Assign gave them.
Captures, and the unit's own impulse responses
Pick a block on the rail, then press Search beside the Tone3000 mark under the rail: the sheet opens on that block's category, amp, pedal or outboard, with the captures already on the pedal listed a folder at a time and a search for more, run by the unit with your own account. With nothing picked, the capture lands at its conventional position. Since 0.8.26 that door is under the rail, where the block is picked, rather than an item in the nav. A C-Verb can be handed one of the unit's own impulse responses with Choose file, with nothing to download, and the app now reads the User folders all the way down, so files you loaded into a subfolder by hand are found too. A search that wants a reverb names one the unit actually has. One NAM capture and one C-Verb per rig, counted separately.
One console, everything down one rail
The console puts everything down one rail: Build, Rigs, History, Device and Setup, with a numbered steps panel that tells a first-time user what the app is for. Setup holds the target device, the backend and the theme. There was a second, older console until 0.8.28, picked in Settings; it is gone, and there is nothing to choose between.
Forked chains, drawn as forks
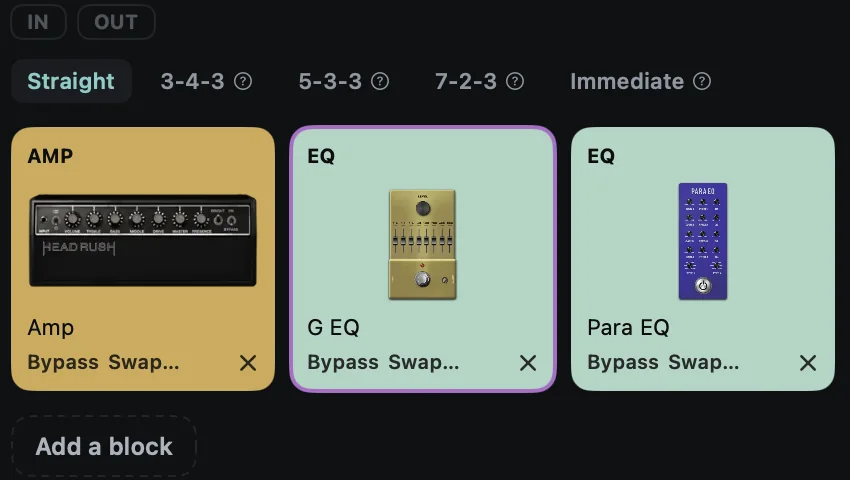
A rig can split into two lanes and join again, and the rail draws it that way: the blocks before the split, the lanes, the join, the blocks after. All five of the unit's path modes render: Straight, the three splits (3-4-3, 5-3-3 and 7-2-3) and Immediate. One honest caveat, from the 0.8.20 release notes: only Straight has been observed on hardware, the three splits are matched to the unit's list by their order rather than measured, and the app marks those three with a question mark. Push a forked rig, then look at it in the unit's own editor before you trust the shape.
Check for Updates, from this site
{{ allApps }} apps ask this site, and only this site: Check for Updates reads a small file, latest.json, that the same publish step writes alongside the download page, and when a newer build is listed it offers to open that page. That is all it does; nothing is downloaded or replaced behind your back. On the Mac, drag the new build over the old one; on Windows, run the installer over the top{{ linuxUpdateNote }}. Your library and settings stay where they are {{ eitherWay }}. It never points at the source repositories, which are private.
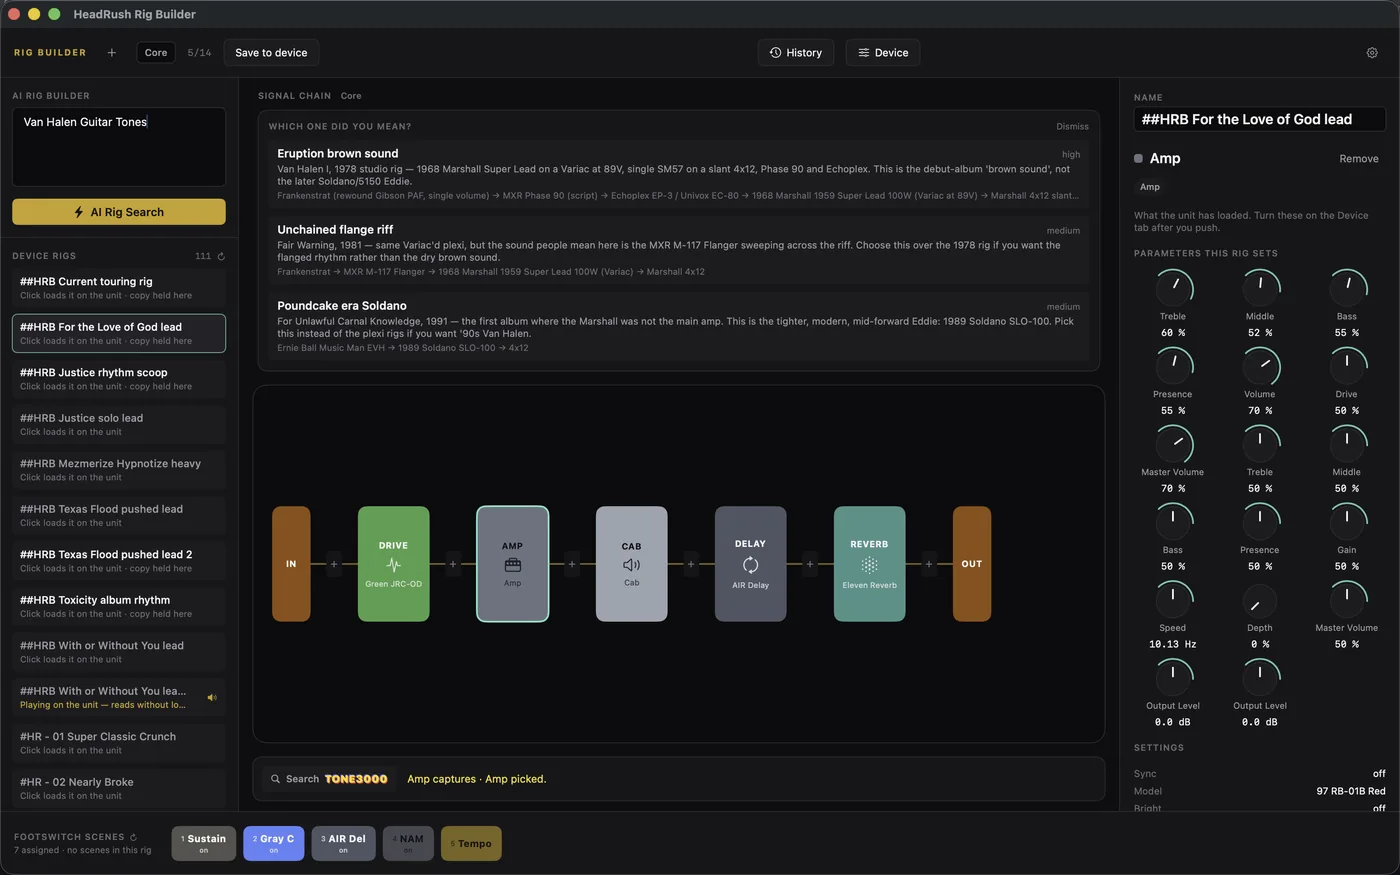
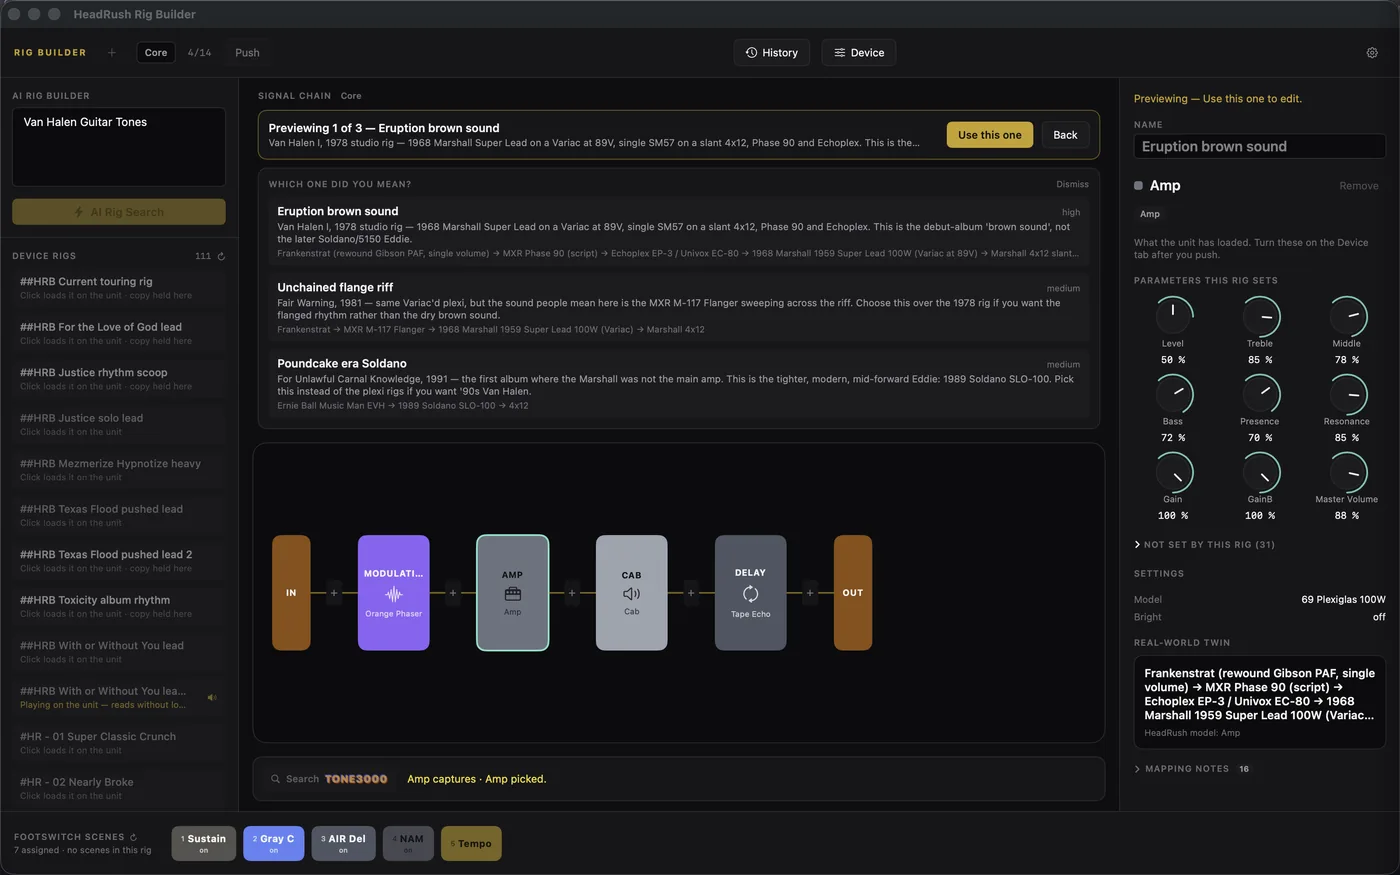
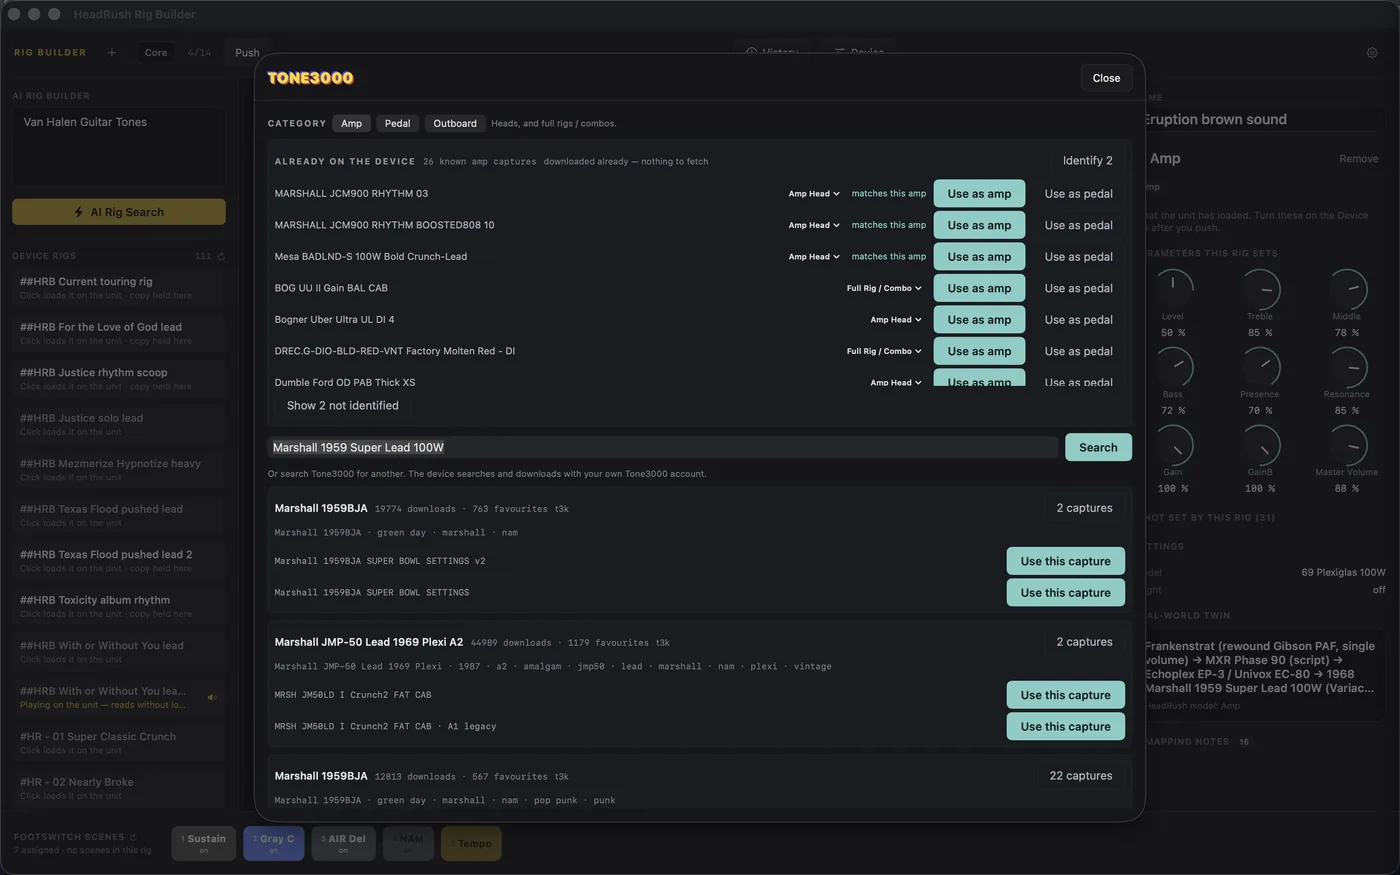
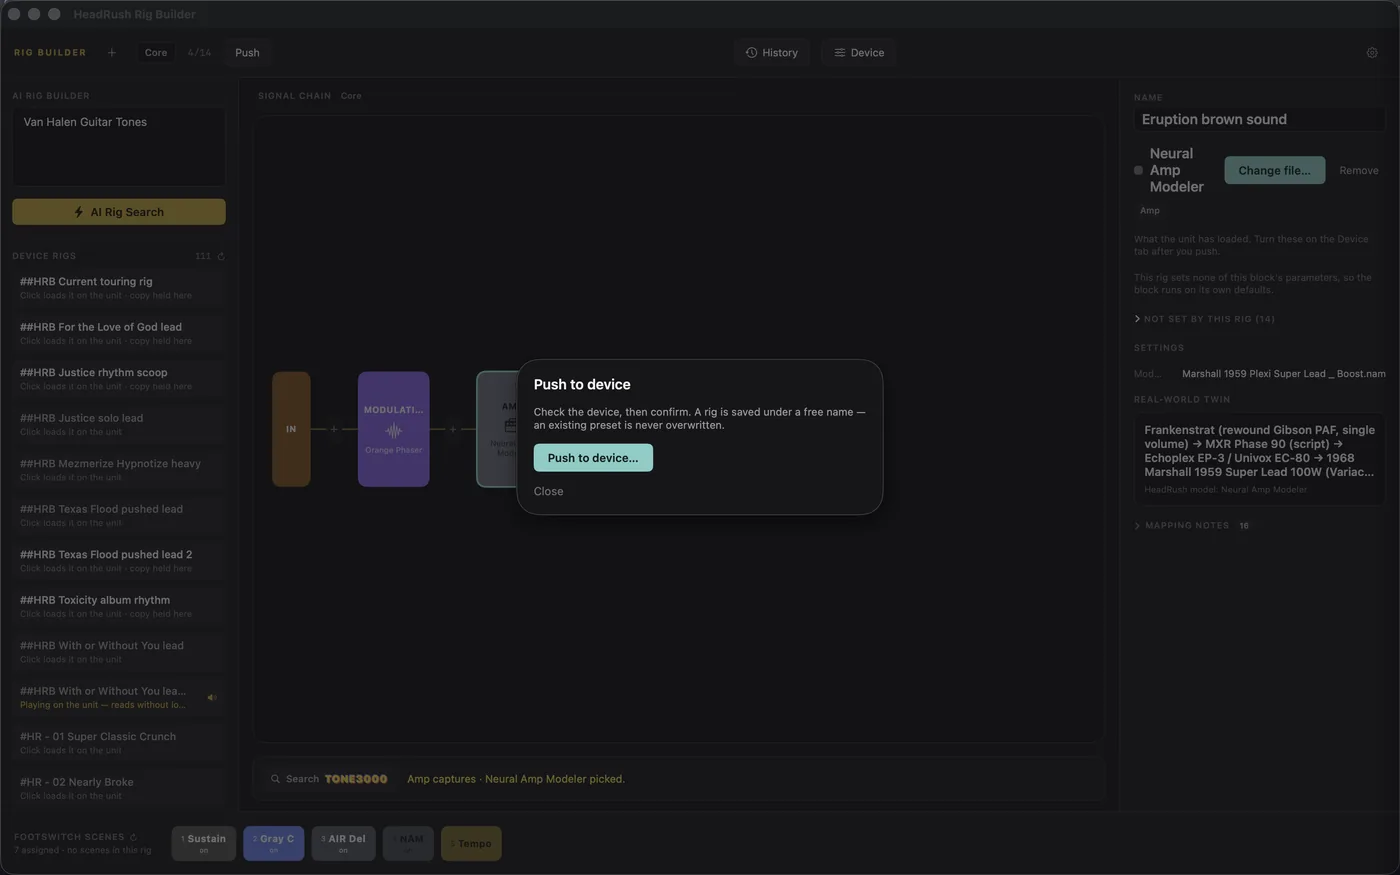
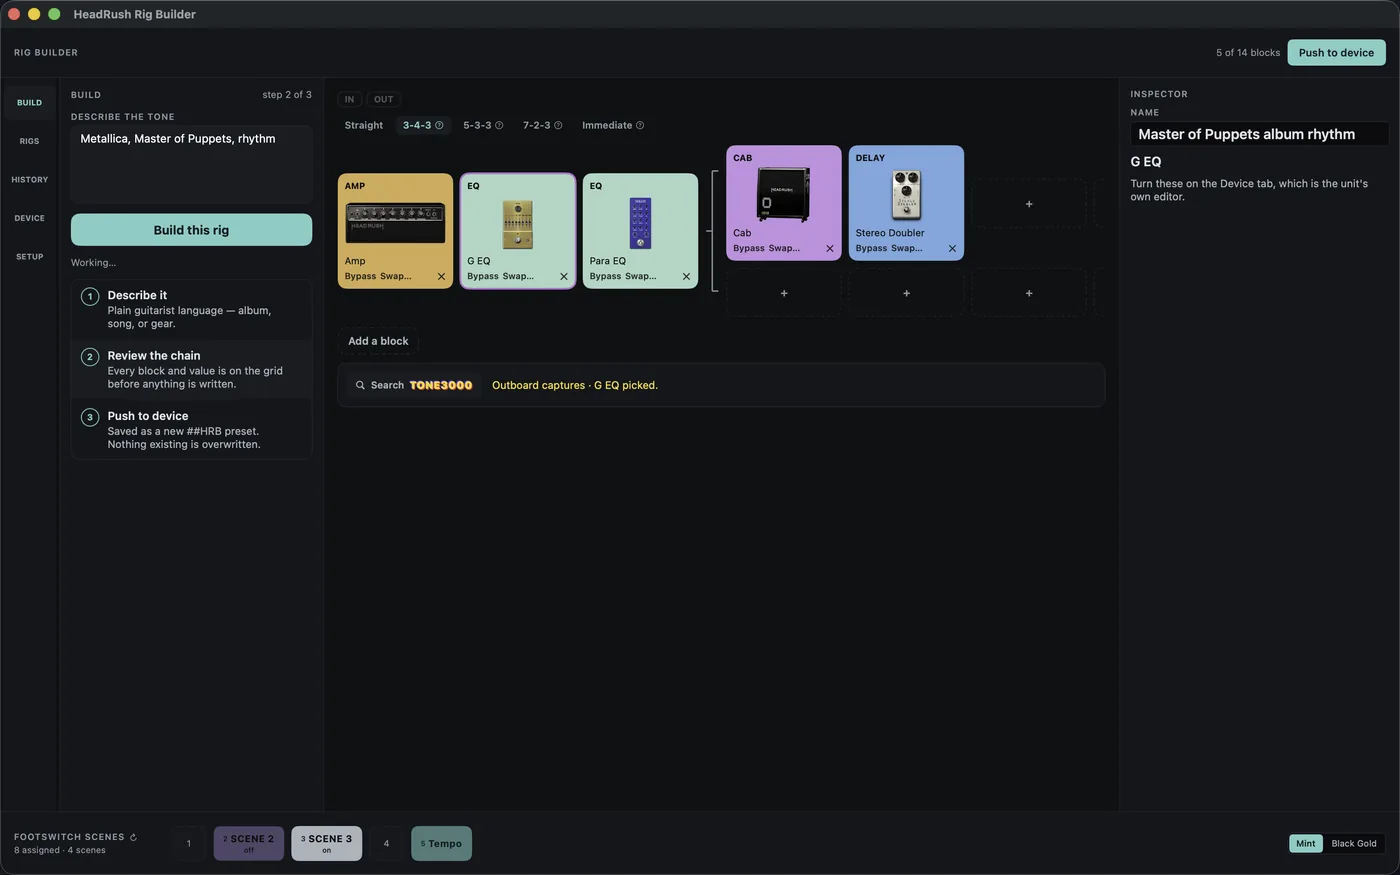
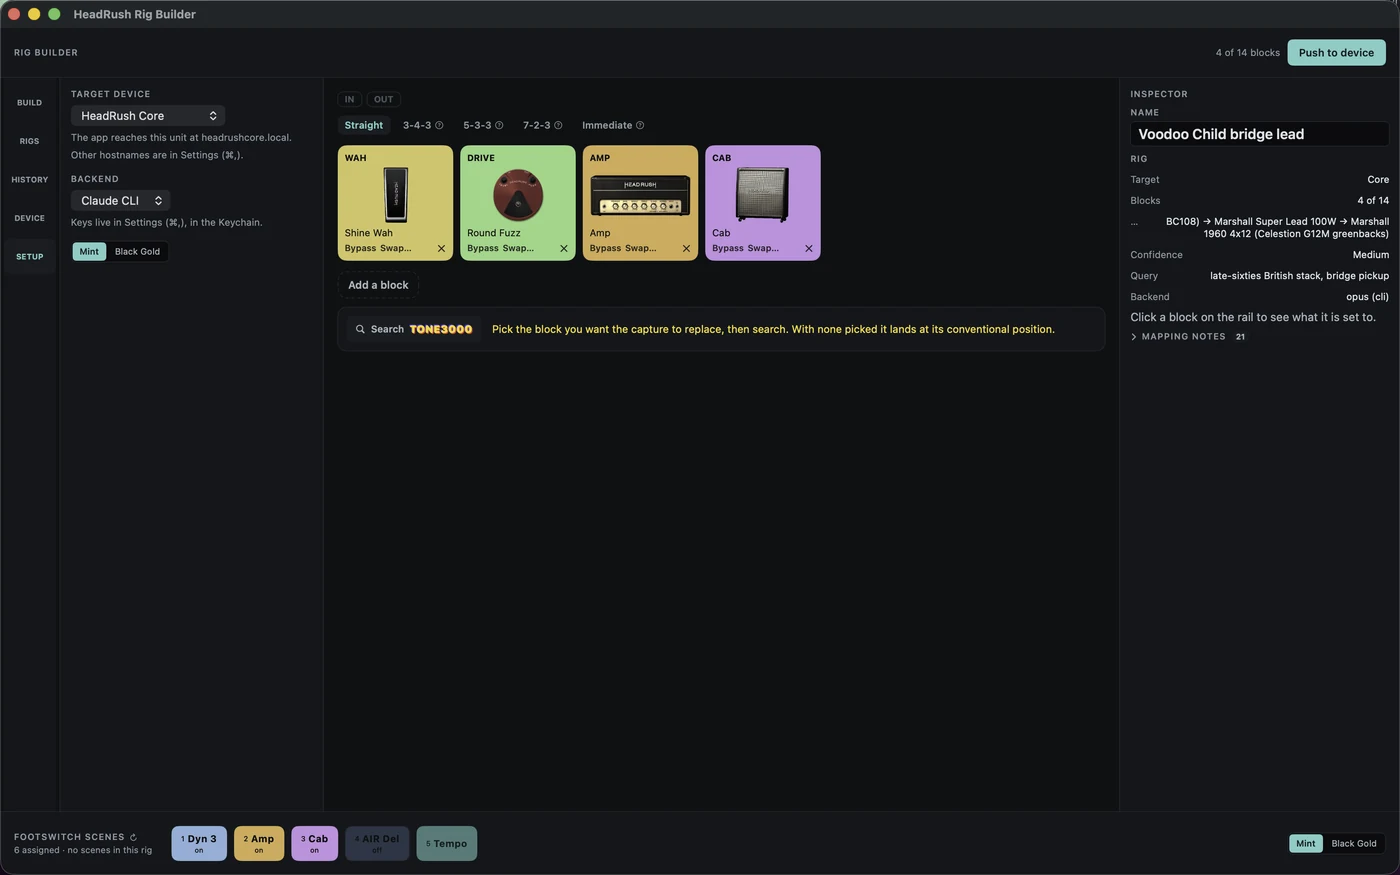
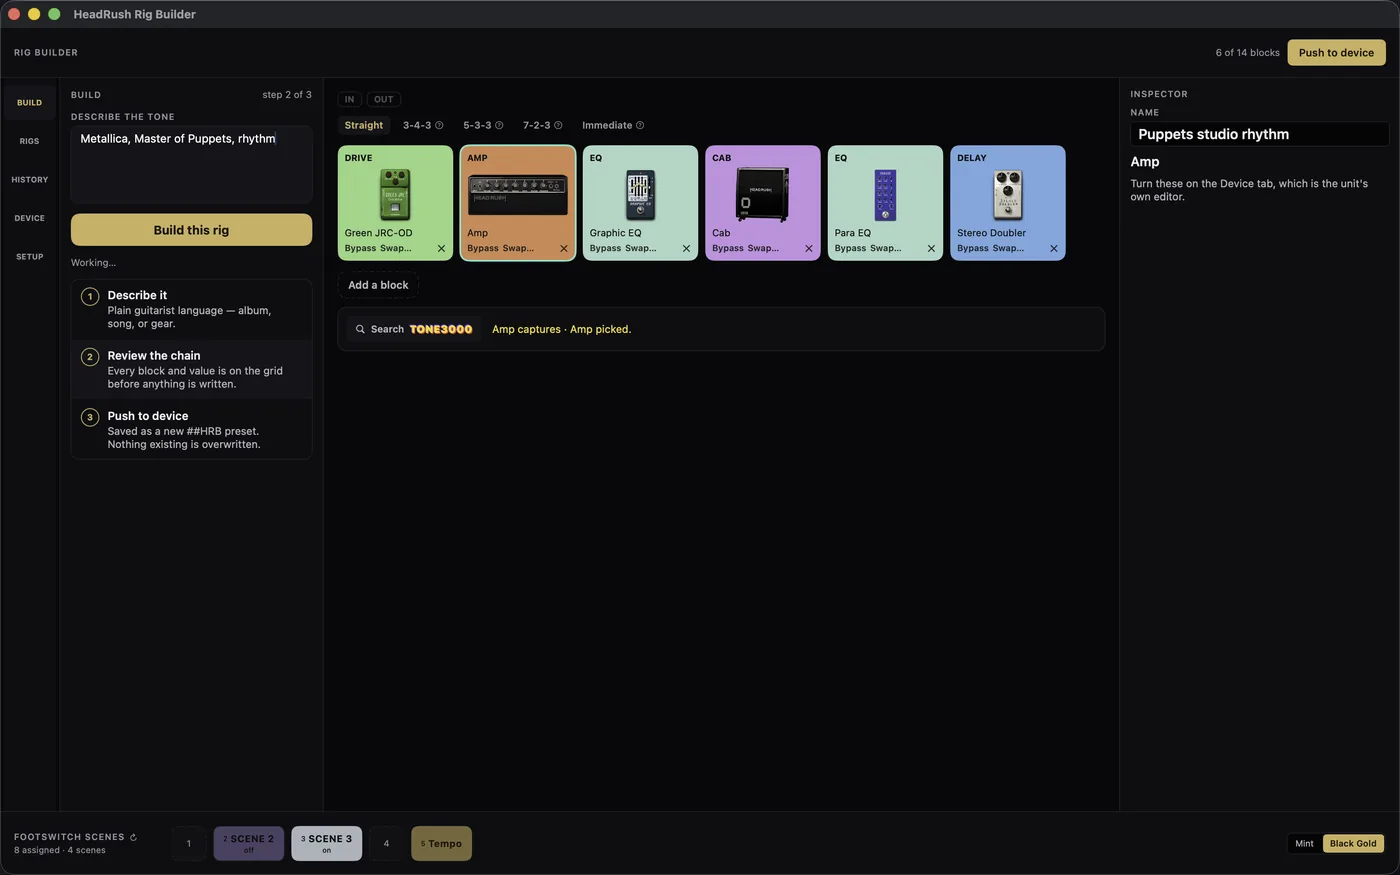
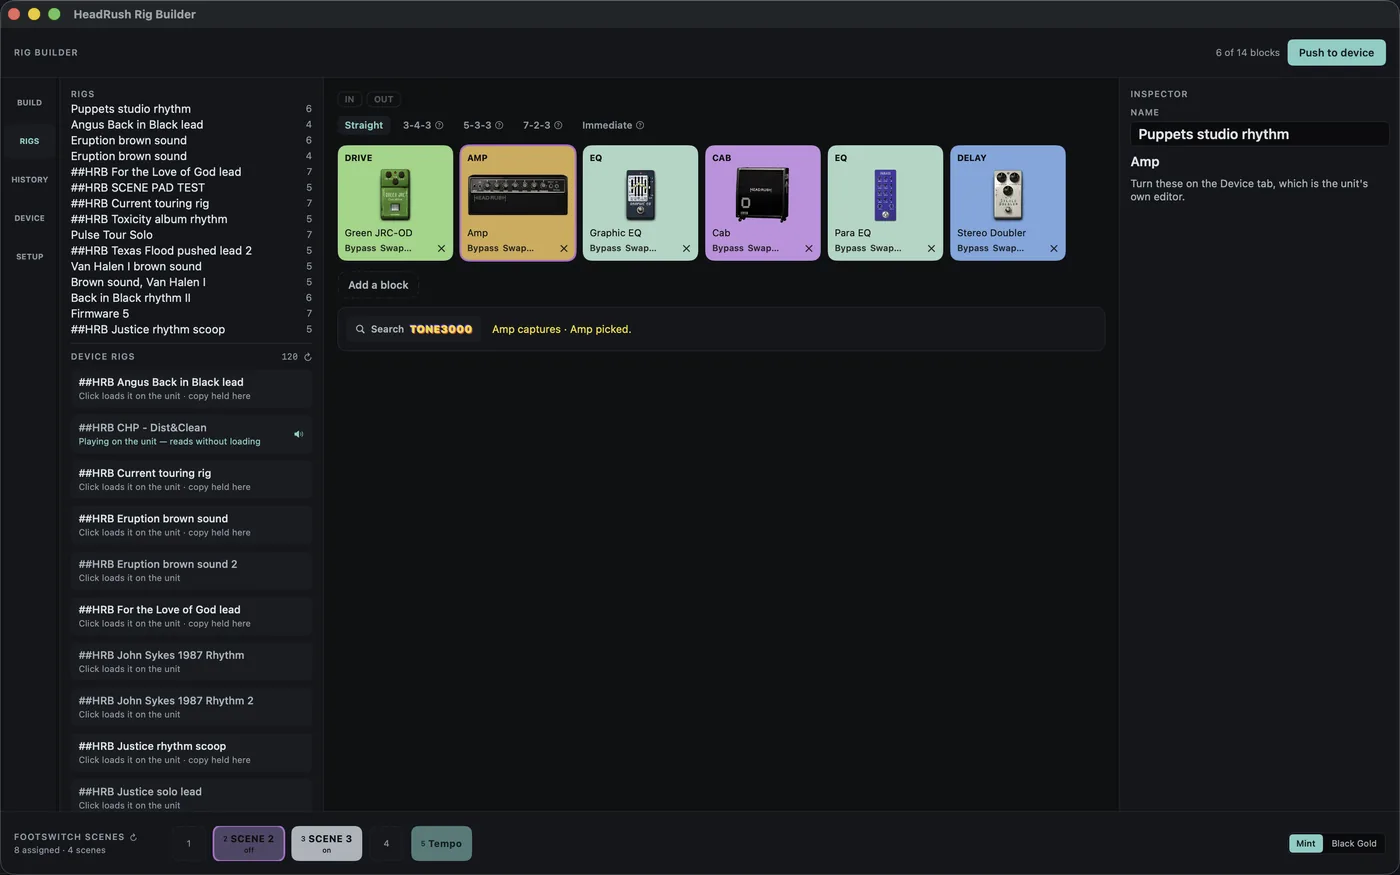
Real screens from macOS 0.8.26, in the Mint theme except where a caption says otherwise.
Three floor units, one workflow
Prime, Core and Flex Prime share the Core's engine, so a rig that fits one fits all three. Point the app at whichever is on your network and every build lands as a valid preset. Footswitch scenes are drawn on the pad layout of the chassis you picked; the pads the unit keeps for itself, previous and next rig in Hybrid mode, are shown and can be renamed, recoloured and cleared, but a scene cannot be recorded onto them.
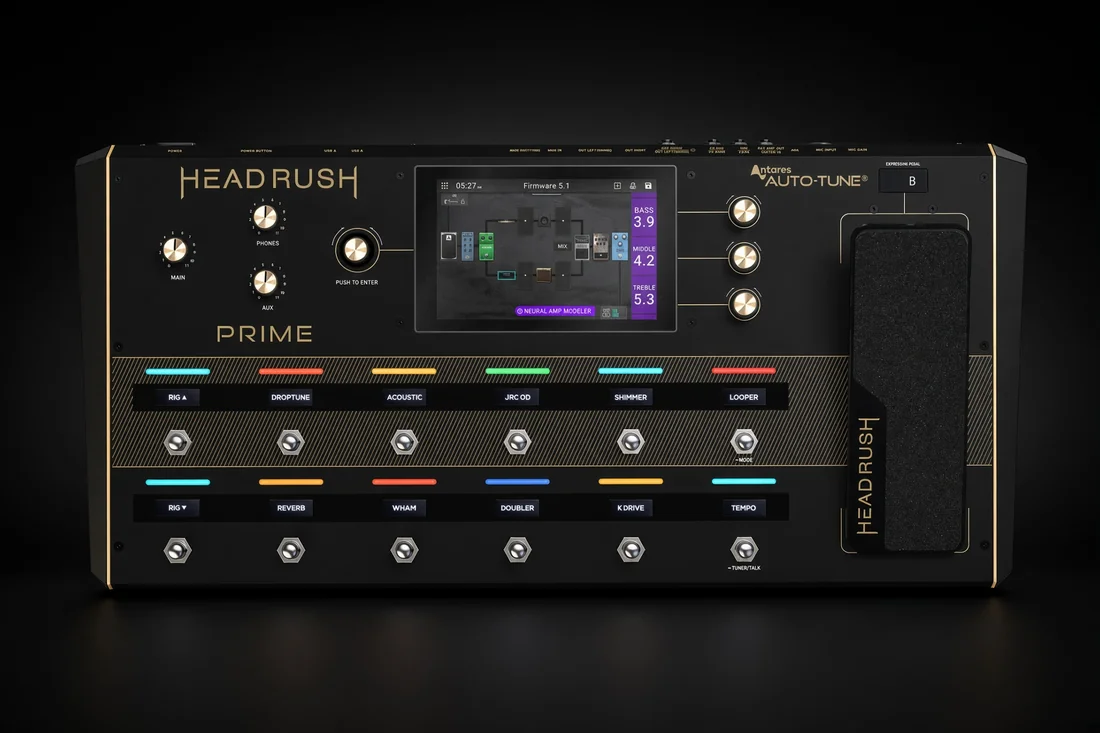
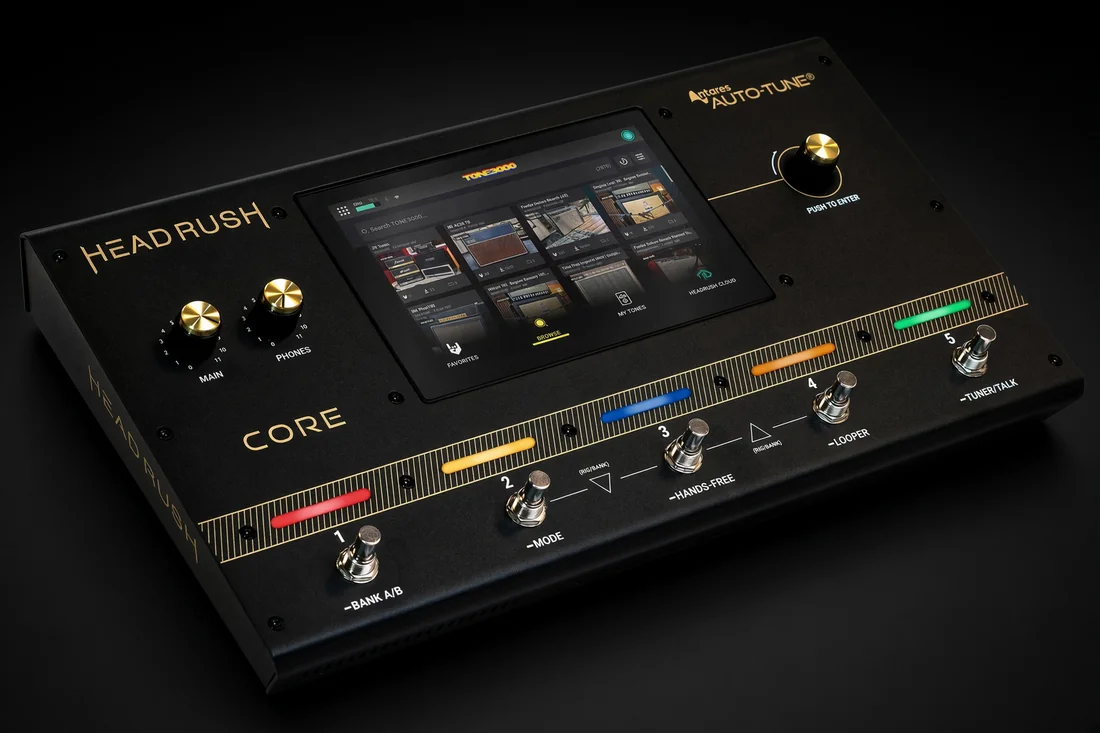
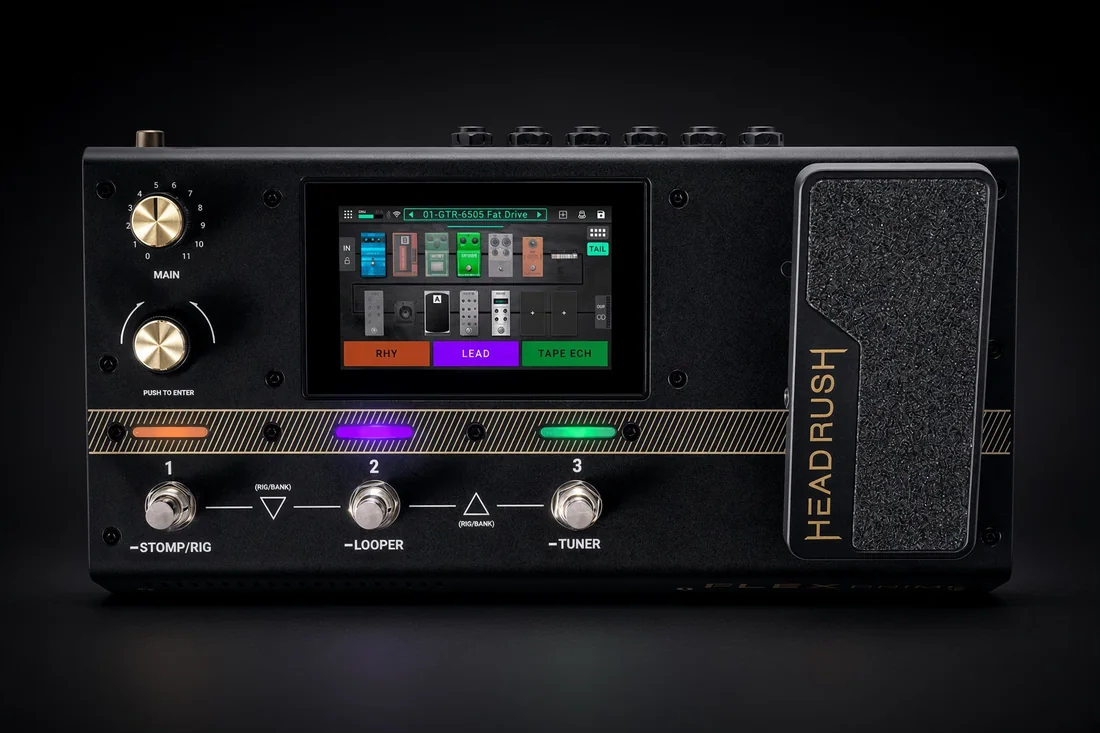
The renders on the cards above are generated images, not photographs, and this project is not affiliated with or endorsed by HeadRush or inMusic Brands.
| Unit | Rig building | Chain | Transfer |
|---|---|---|---|
| Prime | Full | 14 slots, Core engine | Push over the network (mDNS) |
| Core | Full | 14 slots, the reference | Push over the network (mDNS) |
| Flex Prime | Full | 14 slots, Core engine | Push over the network (mDNS) |
The app reaches the unit by its mDNS hostname, headrushcore.local by default, rather than a raw IP, which goes stale with the DHCP lease. A push always saves a new preset, so nothing on the unit is overwritten.
Install and use it on a Mac
Start to finish: set up the AI backend the app will use, get the app, build your first rig, push it to the pedal, then pick your theme and keep it current.
-
01
Set up your AI backend first
The app ships without an AI. When you describe a tone, the app hands your words to a backend you provide and asks it to build the rig, so nothing happens until one of these is set up on this computer. You need exactly one. The three CLIs ride a subscription you may already pay for and need no key; the four keys are billed by their provider per request, except that Google's free tier covers the Gemini Flash models, and none is included in that company's chat subscription. Pick one, set it up, then install the app.
- Claude CLI, the default. Install Claude Code and sign in with a Claude Pro or Max account (the free plan does not include it). The app finds it in ~/.local/bin, in Homebrew, or bundled inside Claude Desktop, so nothing to point at. Click here to find out how to set up the Claude CLI.
- Codex CLI. Install the Codex CLI with OpenAI's installer, Homebrew or npm, or use the copy inside the ChatGPT desktop app, then run it once and choose Sign in with ChatGPT. The app finds it on your PATH, in ~/.local/bin, in Homebrew, or inside the ChatGPT app. Click here to find out how to set up the Codex CLI.
- Grok CLI. Install xAI's Grok CLI with curl -fsSL https://x.ai/cli/install.sh | bash and run grok login. The app finds it on your PATH or at ~/.grok/bin. Click here to find out how to set up the Grok CLI.
- Claude API key. Create a key in Anthropic's Console and paste it into the app's Settings. It also serves as the fallback when the Claude CLI cannot be found. Click here to find out how to set up an Anthropic API key.
- Grok API key. Create a key in the xAI Console and paste it into Settings. Click here to find out how to set up an xAI API key.
- Gemini. Create a key in Google AI Studio and paste it into Settings. A free key reaches the Flash models. Click here to find out how to set up a Gemini API key.
- OpenAI. Create a key at platform.openai.com and add billing to it first; a key with no credit is refused. Paste it into Settings. Click here to find out how to set up an OpenAI API key.
Keys live in the macOS Keychain and go only to the provider you chose. Step 04 is where you tell the app which one you set up, and Test backend there makes one real request so you know it works before your first search.
-
02
Download the app
Grab the latest DMG from the download page and drag the app into /Applications. Apple silicon and Intel are both covered by the universal build; it needs macOS 14 Sonoma or newer.
-
03
Opening it the first time
Release builds are Developer ID-signed, notarized and stapled, both the app and the disk image, so Gatekeeper lets it open normally on first launch, even offline. If macOS ever warns you, you're holding a development build rather than a release.
-
04
Choose a tone-search backend
Settings (⌘,) → AI backend: pick the one you set up in step 01. The default, Claude CLI, runs on your existing Claude subscription, and the app finds the CLI wherever it is installed: Claude Desktop's bundled copy, the standard install in ~/.local/bin, or Homebrew's. If you don't have the CLI, paste an Anthropic API key instead (it doubles as the CLI's fallback), or use the Codex CLI on a ChatGPT subscription, the Grok CLI, an xAI key, a Google key for Gemini, or an OpenAI key. The three CLIs need no key: install each one and sign in once, as in step 01. Keys are stored in the Keychain and sent only to the provider you chose. Test backend makes one real request, so a key that is saved but has no credit on it says so here rather than at your first search, which is the likeliest first stumble: a key is billed separately from the same company's chat subscription, so ChatGPT Plus does not pay for OpenAI API calls. Keys are made at platform.openai.com/api-keys, with credit added under Billing in the same dashboard.
-
05
Point it at your pedal
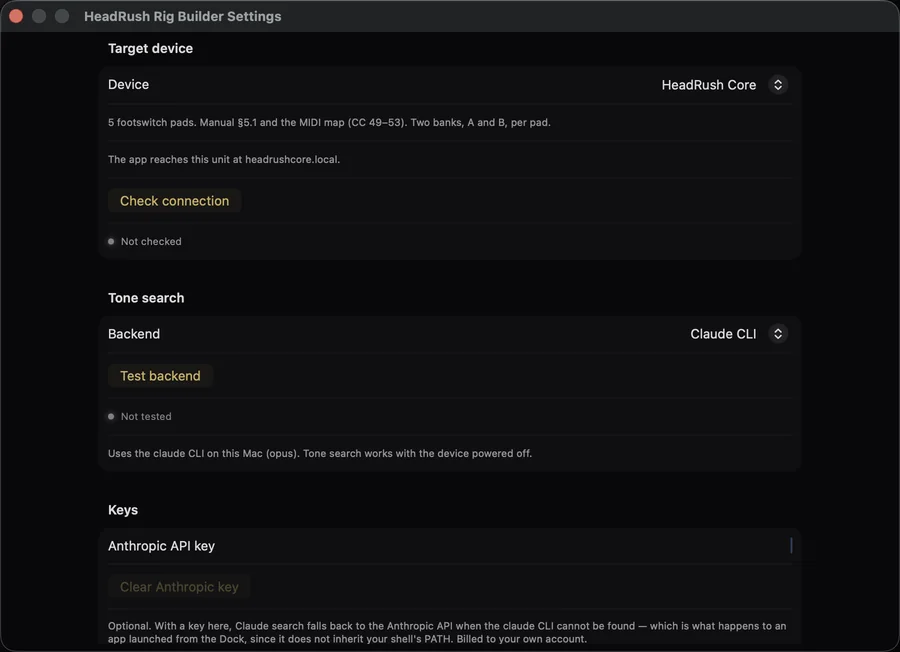
Pick your chassis at the top of Settings (Prime, Core or Flex Prime) and the app addresses that unit by its own mDNS name. That is the only thing to set, and Check connection names what answered, so you can tell a wrong pick from a quiet network. Leave it as the mDNS name rather than typing a raw IP: the pedal's DHCP lease goes stale, and a hardcoded address makes a working unit look offline. Tone search works with the pedal switched off; only push and Device need it on the network. The same pick also lives in the Setup panel, next to the backend and the theme.
Prime        headrushprime.local
Core         headrushcore.local
Flex Prime   headrushflexprime.local
-
06
Search your first tone
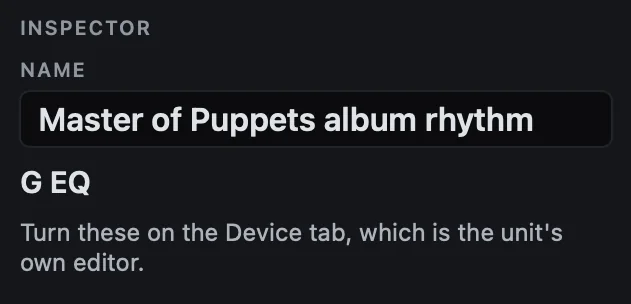
Describe it, say “Metallica, Master of Puppets, rhythm”, then review the result on the signal rail: every block in signal order, every parameter the search set, and how many of the unit's 14 slots it uses. Give it a name in the inspector's Name field on the right, and press Return. Pick something you'll recognise on a dark stage.
-
07
Push it to the pedal
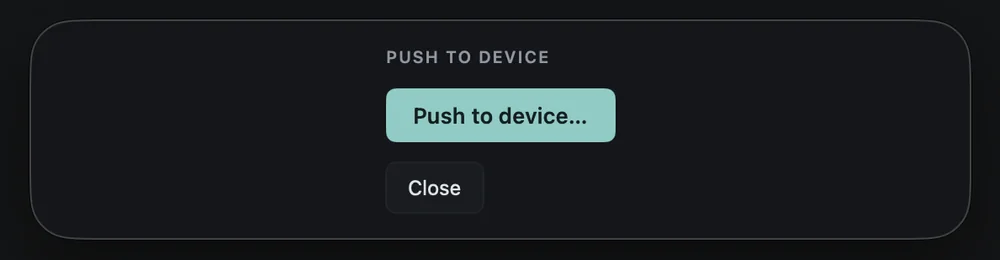
Push to device, top right, then Push to device… in the sheet: the app checks the unit, builds the rig on it block by block, saves it and reads every parameter back, then takes you to Device. There is nothing to confirm. It always saves a new preset, “##HRB Name”, or “##HRB Name 2” if that is taken, and nothing on the unit is overwritten. Knob tweaks afterwards happen in Device, which is the HeadRush Remote Editor running inside the app.
-
08
Your theme
The console puts Build, Rigs, History, Device and Setup down one rail. Theme, Mint or Black Gold, is picked from the right-hand end of the footswitch strip, or in Setup. The screenshots on this site are in Mint except where a caption says otherwise.
-
09
Stay updated
HeadRush Rig Builder → Check for Updates… asks this site for its latest.json and, when a newer Mac build is listed, offers to open the download page. That is all it does: nothing is downloaded or replaced by the app. Drag the new build over the old one and your library and settings stay where they are.
“No backend found”, but only from the Dock
A GUI app launched from the Dock doesn't inherit your shell's PATH, which used to hide a Claude CLI installed in ~/.local/bin. Since 0.8.15 the app looks in the install locations itself: Claude Desktop's bundled CLI, the standard install in ~/.local/bin, then Homebrew's /opt/homebrew/bin, taking the first that actually runs. What still hides it is a shell alias or function named claude, which no spawned process can see. Put the CLI's directory on the PATH the app itself sees, or paste an Anthropic API key in Settings, which needs no CLI at all.
Search fails or times out
On an API backend, usually the key: check it's pasted whole, still active, and has credit on the provider side. Under Claude CLI, a saved key is the automatic fallback when the CLI fails.
Push can't find the unit
Same network as the Mac, and reached by hostname. A second unit of the same model shows up with a suffixed mDNS name, which goes in the Other… field. Guest and isolated Wi-Fi networks often block mDNS entirely.
Install and use it on Windows
The same shape as the Mac guide, with the paths and prompts Windows actually shows you. You don't need any developer tools.
-
01
Set up your AI backend first
The app ships without an AI. When you describe a tone, the app hands your words to a backend you provide and asks it to build the rig, so nothing happens until one of these is set up on this computer. You need exactly one. The three CLIs ride a subscription you may already pay for and need no key; the four keys are billed by their provider per request, except that Google's free tier covers the Gemini Flash models, and none is included in that company's chat subscription. Pick one, set it up, then install the app.
- Claude CLI, the default. Install Claude Code with irm https://claude.ai/install.ps1 | iex in PowerShell, or winget install Anthropic.ClaudeCode, and sign in with a Claude Pro or Max account (the free plan does not include it). The app finds claude.exe in %USERPROFILE%\.local\bin, the npm shim in %APPDATA%\npm, or anything on your PATH. Click here to find out how to set up the Claude CLI.
- Codex CLI. Install the Codex CLI with OpenAI's Windows installer or npm, then run it once and choose Sign in with ChatGPT. Click here to find out how to set up the Codex CLI.
- Grok CLI. Install xAI's Grok CLI with irm https://x.ai/cli/install.ps1 | iex in PowerShell and run grok login. The app finds it on your PATH or in %USERPROFILE%\.grok\bin. Click here to find out how to set up the Grok CLI.
- Claude API key. Create a key in Anthropic's Console and paste it in when the app asks, or later in Settings. Click here to find out how to set up an Anthropic API key.
- Grok API key. Create a key in the xAI Console and paste it in. Click here to find out how to set up an xAI API key.
- Gemini. Create a key in Google AI Studio and paste it in. A free key reaches the Flash models. Click here to find out how to set up a Gemini API key.
- OpenAI. Create a key at platform.openai.com and add billing to it first; a key with no credit is refused. Click here to find out how to set up an OpenAI API key.
Keys are stored encrypted with Windows DPAPI and go only to the provider you chose. The first launch asks which backend you set up (step 04), and Settings can probe it without running a full search.
-
02
Download the installer
Take the installer from the download page. It's 64-bit, for Windows 10 or 11. There's also a portable exe that runs without installing anything.
-
03
Get past SmartScreen
The build isn't code-signed yet, so Windows shows “Windows protected your PC”. Click More info → Run anyway. If your browser blocked the download, keep it from the downloads list first. The installer needs no admin password and puts a shortcut in the Start menu.
-
04
Answer two questions
First launch asks two things: how tone search should think, which is the backend you set up in step 01 (your Claude subscription via the Claude Code CLI, which is the default, your ChatGPT subscription via the Codex CLI, a Claude API key, your Grok subscription via the Grok CLI, a Grok API key, a Google key for Gemini, or an OpenAI key), and which HeadRush you have. Both are skippable and changeable later in Settings, which can also probe a backend without running a full search, and that probe is worth running: an API key is billed separately from the same company's chat subscription, so ChatGPT Plus does not pay for OpenAI API calls and a new key answers nothing until credit is added at platform.openai.com. A saved key is stored encrypted with Windows DPAPI, never in plain text.
-
05
Search your first tone
Type what you're after, say “Metallica, Master of Puppets, rhythm”, watch the progress stream, then review the staged result on the signal rail: every block in order, every parameter set, and how many of the unit's 14 slots it uses. Give it a short, stage-readable name.
-
06
Push it to the pedal
Push to device, top right: the app checks the unit, asks once (Yes, push it), and it lands as a new preset. It is saved as “##HRB Name”, or “##HRB Name 2” if that is taken, and existing presets are never overwritten. Knob tweaks afterwards happen in Device, the HeadRush Remote Editor running inside the app.
-
07
Stay updated
File → Check for Updates asks this site for its latest.json and opens the download page when something newer is listed; an “Update” pill also appears in the top bar. It only ever talks to this site. Installing over the top keeps your library and settings, and the app never updates itself behind your back. Everything the app saves lives here (File → Open Data Folder takes you there):
%APPDATA%\WinHeadrushRigBuilder
-
08
Your theme
Windows draws the same console as the Mac: Build, Rigs, History, Device and Setup down one rail. Theme, Mint or Black Gold, is picked from the right-hand end of the footswitch strip, or in Setup. The screenshots on this site are from the Mac build; the Windows one draws the same console.
Antivirus quarantines the download
Unsigned installers trip heuristics. Restore it and add an exclusion for the install folder.
The app can't find the unit
Reach it by hostname, headrushcore.local, rather than by IP: the unit answers over mDNS, and its IPv4 lease can be stale while the hostname still works. Both machines need to be on the same network, and guest or isolated Wi-Fi usually blocks mDNS.
Something else misbehaves
File → Open Data Folder, then logs\server.log. That's the file to attach to a bug report.
Linux is on its way
A Linux build, an AppImage and a .deb for x86_64, is being tested. This guide and its download appear the day the first release is public. Until then the Mac and Windows guides are the ones to read.
Install and use it on Linux
The same shape as the Mac and Windows guides, with the commands and notices Linux actually shows you. An AppImage or a .deb, for x86_64; no developer tools needed.
-
01
Set up your AI backend first
The app ships without an AI. When you describe a tone, the app hands your words to a backend you provide and asks it to build the rig, so nothing happens until one of these is set up on this computer. You need exactly one. The three CLIs ride a subscription you may already pay for and need no key; the four keys are billed by their provider per request, except that Google's free tier covers the Gemini Flash models, and none is included in that company's chat subscription. Pick one, set it up, then install the app.
- Claude CLI, the default. Install Claude Code with curl -fsSL https://claude.ai/install.sh | bash and sign in with a Claude Pro or Max account (the free plan does not include it). The app finds claude in ~/.local/bin, /usr/local/bin, an npm global bin (nvm, Volta and Bun installs included), ~/bin, or anything on your login shell's PATH, even when you start it from the desktop. Click here to find out how to set up the Claude CLI.
- Codex CLI. Install the Codex CLI with npm install -g @openai/codex, then run codex once and choose Sign in with ChatGPT. Click here to find out how to set up the Codex CLI.
- Grok CLI. Install xAI's Grok CLI with curl -fsSL https://x.ai/cli/install.sh | bash and run grok login. The app finds it in ~/.grok/bin or on your PATH. Click here to find out how to set up the Grok CLI.
- Claude API key. Create a key in Anthropic's Console and paste it in when the app asks, or later in Settings. Click here to find out how to set up an Anthropic API key.
- Grok API key. Create a key in the xAI Console and paste it in. Click here to find out how to set up an xAI API key.
- Gemini. Create a key in Google AI Studio and paste it in. A free key reaches the Flash models. Click here to find out how to set up a Gemini API key.
- OpenAI. Create a key at platform.openai.com and add billing to it first; a key with no credit is refused. Click here to find out how to set up an OpenAI API key.
Keys are stored through your desktop keyring, GNOME Keyring or KWallet, and go only to the provider you chose. If no keyring is running, the app tells you at first launch that a saved key would not be encrypted; the three CLIs keep their own sign-ins and are not affected. The first launch asks which backend you set up (step 04), and Settings can probe it without running a full search.
-
02
Download the AppImage or the .deb
Take either from the download page. Both are x86_64 and need glibc 2.33 or newer: Ubuntu 22.04 and later, Debian 12 and later, Fedora 34 and later, but not Ubuntu 20.04 or Debian 11. On Ubuntu and Debian take the .deb: it installs Chromium's sandbox helper, puts the app in your menu, and asks for the mDNS resolver the unit's hostname needs. Anywhere else, the AppImage is one file that runs without installing anything.
-
03
Run it
The .deb installs with sudo apt install ./headrush-rig-builder_<version>_amd64.deb; then start HeadRush Rig Builder from your menu. The AppImage needs to be made executable once, then it runs from wherever you keep it, by double-click or from a terminal:
chmod +x HeadRushRigBuilder-<version>-x86_64.AppImage
./HeadRushRigBuilder-<version>-x86_64.AppImage
It needs no libfuse2. On Ubuntu 23.10 and later, AppArmor refuses the unprivileged user namespaces Chromium's sandbox asks for, and the AppImage's launcher then runs the app without that sandbox; the .deb keeps it, which is why it is the pick there. Neither build is signed, so there is no signature to check and nothing to click past; take them from this site only. The first launch may show one or two notices, about the keyring and about .local names; each says what to install, and each is shown once.
-
04
Answer two questions
First launch asks two things: how tone search should think, which is the backend you set up in step 01 (your Claude subscription via the Claude Code CLI, which is the default, your ChatGPT subscription via the Codex CLI, a Claude API key, your Grok subscription via the Grok CLI, a Grok API key, a Google key for Gemini, or an OpenAI key), and which HeadRush you have. Both are skippable and changeable later in Settings, which can also probe a backend without running a full search, and that probe is worth running: an API key is billed separately from the same company's chat subscription, so ChatGPT Plus does not pay for OpenAI API calls and a new key answers nothing until credit is added at platform.openai.com. A saved key goes into your desktop keyring, never into a plain file, unless the app has told you there is no keyring to use.
-
05
Search your first tone
Type what you're after, say “Metallica, Master of Puppets, rhythm”, watch the progress stream, then review the staged result on the signal rail: every block in order, every parameter set, and how many of the unit's 14 slots it uses. Give it a short, stage-readable name.
-
06
Push it to the pedal
Push to device, top right in the console: the app checks the unit, asks once (Yes, push it), and it lands as a new preset. It is saved as “##HRB Name”, or “##HRB Name 2” if that is taken, and existing presets are never overwritten. Knob tweaks afterwards happen in Device, the HeadRush Remote Editor running inside the app.
-
07
Stay updated
File → Check for Updates asks this site for its latest.json and opens the download page when something newer is listed; an “Update” pill also appears in the top bar. It only ever talks to this site, and it never replaces anything itself. With the AppImage, download the new one and run it in place of the old; with the .deb, install the new package over the top. Your library and settings stay put either way, here (File → Open Data Folder takes you there):
~/.config/headrush-rig-builder
-
08
Your theme
Linux draws the same console as the Mac and Windows: Build, Rigs, History, Device and Setup down one rail. Theme, Mint or Black Gold, is picked from the right-hand end of the footswitch strip, or in Setup. The screenshots on this site are from the Mac build; the Linux one draws the same console.
“This computer cannot look up .local names”
The unit announces itself as headrushcore.local over mDNS, and Linux only resolves such names through a module. Install avahi-daemon and libnss-mdns (sudo apt install avahi-daemon libnss-mdns on Debian and Ubuntu, sudo dnf install avahi nss-mdns on Fedora), check that the hosts: line of /etc/nsswitch.conf includes mdns4_minimal, and restart the app. Ubuntu desktop ships both already.
The app can't find the unit
Reach it by hostname, headrushcore.local, rather than by IP: the unit answers over mDNS, and its IPv4 lease can be stale while the hostname still works. Both machines need to be on the same network, and guest or isolated Wi-Fi usually blocks mDNS.
“Saved API keys are not encrypted on this computer”
There is no desktop keyring for the app to use, so a key you save would be readable by anyone who can read your files. Install and unlock GNOME Keyring (gnome-keyring) or KWallet, restart the app, and enter the key again. The Claude, Codex and Grok CLIs keep their own sign-ins and are not affected.
The AppImage does nothing when run
Check it is executable (step 03). If the distro is older than glibc 2.33, Ubuntu 20.04 or Debian 11 for instance, the app's engine cannot start at all; that needs a newer release of the distro, not a newer app.
Something else misbehaves
File → Open Data Folder, then logs/server.log. That's the file to attach to a bug report.
Get {{ appName }}
Free, built from source you can read. {{ versionLine }}.
macOS
Universal build for Apple silicon and Intel, macOS 14 or newer. Signed, notarized and stapled, so it opens without warnings.
Windows
64-bit for Windows 10 and 11. No admin rights needed; a portable exe is there too if you'd rather not install.
Linux
x86_64, as an AppImage or a .deb, on glibc 2.33 or newer. On Ubuntu 23.10 and later the AppImage runs without Chromium's sandbox, so prefer the .deb on Ubuntu and Debian. Unsigned, like the Windows build.
The Mac build is notarized and opens clean. The Windows build isn't code-signed yet, so SmartScreen warns on first run; the Windows guide covers the two clicks past it.{{ linuxSigningNote }} The downloads and the notes above come from the public releases repository; the source repositories stay private.
The app, control by control
Every button in the console, what it does, and where it is. The screens are macOS {{ macVersion }} in the Mint theme; {{ otherConsoles }} the same console, and where it differs the line says so.
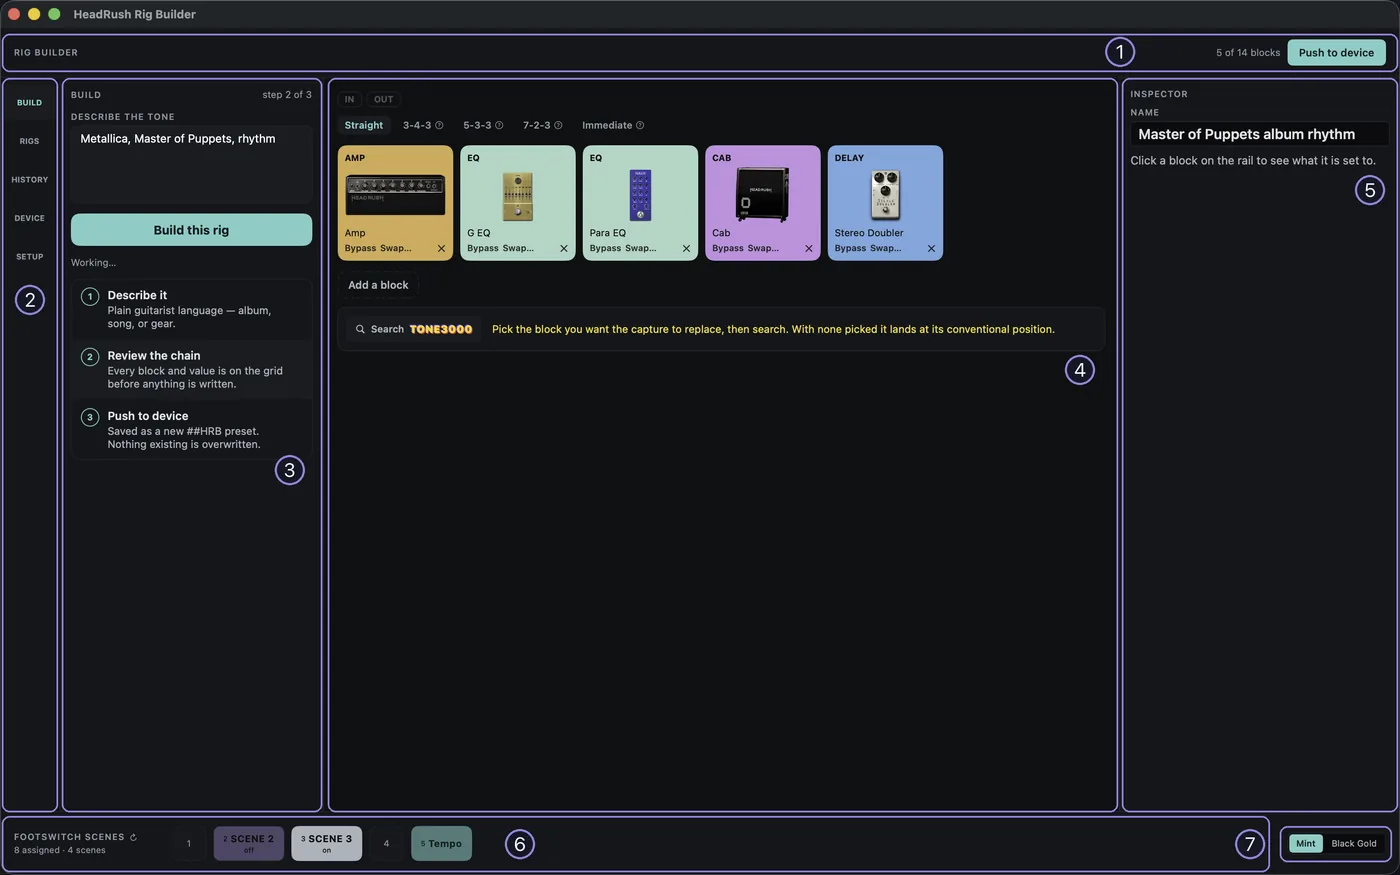
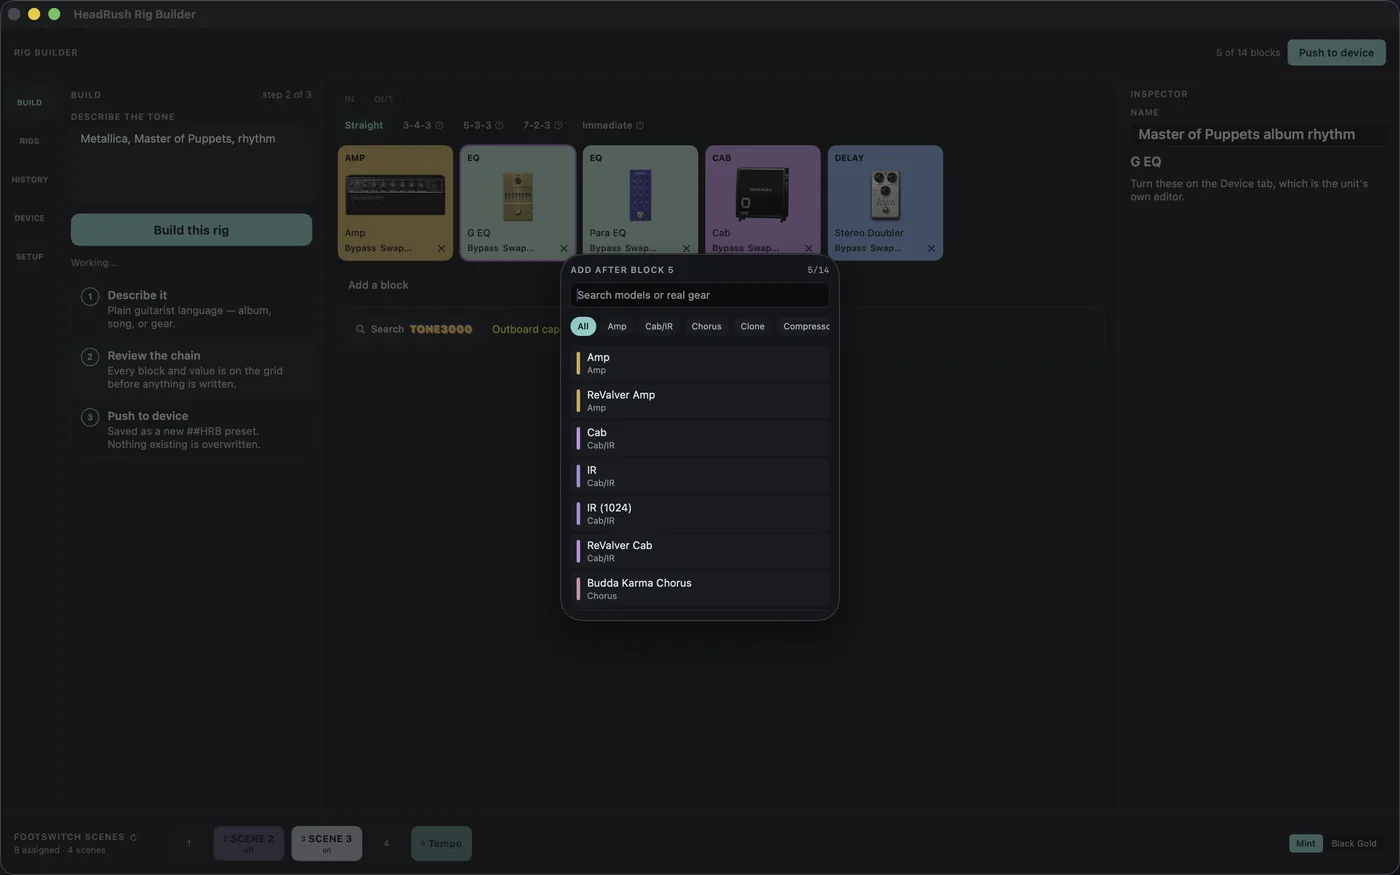
- 1Top bar. The block count, N of 14 blocks, and Push to device.
- 2Nav. Build, Rigs, History, Device, Setup. Hover one for a one-line hint.
- 3Side panel. Whichever of Build, Rigs, History or Setup is picked. Device is not a panel; it swaps the canvas for the unit's own editor.
- 4Canvas. IN and OUT, the five path modes, the rail of block cards, Add a block, the Tone3000 door, and the reverb offer when a rig names real hardware.
- 5Inspector. The rig's Name, then whatever block you have picked on the rail.
- 6Footswitch scenes. Your chassis's real pads, read from the unit, plus EXP.
- 7Theme. Mint or Black Gold, picked here at the bottom right or in Setup. It changes with the room, so it is not in the Settings window.
-
01
Describe it, then Build this rig
Build is the panel the app opens on. Type into Describe the tone, a record, a song, a player or the gear itself, and press Build this rig. The button is off until there is text in the box, reads Building… while the search runs, and prints the search's progress lines underneath as it goes. Anything it could not do is written in red under the button rather than hidden.
The three numbered steps under it, Describe it, Review the chain and Push to device, are the whole job; the header says which one you are on, step 2 of 3. A rig opened from Rigs or History counts step 1 as done, because you did not need to describe it.
-
02
Choose among the candidates
An ambiguous ask comes back as a short list, 2 to choose from, each with a line on what sets it apart. Click one and the rail becomes a preview of it: a bar above the cards reads Previewing 1 of 2 with the candidate's name, and Read-only, Escape goes back. Click another to swap the preview without losing anything.
Back returns the rig you had, exactly. Use this one adopts the candidate. Escape, or a click on IN or OUT, is also Back. While a preview shows, the cards carry no edit controls and Push to device is off, with the top bar saying why: Keep this rig first, Use this one.
-
03
Edit the rail by hand
Each card is one block: its type across the top, the unit's own picture of it when the unit is on, and the model's name. Click a card to pick it; the ring is the selection. Along its foot: Bypass (or Engage, when it is off; a bypassed card dims), Swap…, which changes the model and keeps the slot, and the × that removes it. Drag a card to reorder. The spacebar bypasses the picked block whenever you are not typing, and ⌘Z undoes every edit on this page.
Add a block, under the rail, opens the palette: the unit's 21 categories and every block in them, with the real gear each one stands for, a search box for either name, and the budget, N/14, in the corner. An empty cell's dashed + adds into that exact position and lane. Anything the hardware would refuse, a fifteenth block, a second NAM capture, is named on the rail rather than silently dropped.
Above the rail, the path modes: Straight, 3-4-3, 5-3-3, 7-2-3 and Immediate. Pick one and the rail redraws as that fork. The question mark on a mode means its routing is matched to the unit's list by order rather than measured; check a forked rig in Device before trusting the shape.
-
04
Name it, and read a block
The inspector on the right starts with Name: type, press Return, and the rig is renamed; that is the name the unit will show, prefixed ##HRB. Under it, the picked block: its model, and for the blocks whose sound is a file, a Choose file… button (Change file… once one is loaded). The knobs themselves are not here. The console shows a rig; the unit edits it, on the Device tab.
-
05
Captures, impulse responses, and the offer
The bar under the rail with the Tone3000 mark is the door. Pick the block you want the capture to replace, then press Search: the sheet opens on that block's category, amp, pedal or outboard, lists the captures already on the unit a folder at a time, and searches Tone3000 for more. The unit does the searching and downloading with your own account. With nothing picked the capture lands at its conventional position, and the note beside the button says so.
A C-Verb takes one of the unit's own impulse responses instead, from Choose file… in the inspector; nothing is downloaded. And when a search names real hardware that the unit holds a folder for, a sentence and a button per matching folder appear under the rail: the reverb offer. Press one and the browser opens on that folder; nothing loads until you pick a file. One NAM capture and one C-Verb per rig.
-
06
Footswitch scenes
The strip along the bottom is your chassis's real pads, read off the unit and coloured by the block each one toggles; the header counts them, 8 assigned · 4 scenes, and the small arrow re-reads the unit. Click a pad to pick it. Right-click it for the menu. On a pad with no scene of the rig's it offers one thing, Capture current rail, which records what every block is doing right now as that scene. Once the pad holds one, the menu grows: Rename… sets the label the pad will wear on the unit, Colour picks from the unit's own numbered colours, and Clear scene takes it back to the unit's live assignment.
Only the pads the unit can press in every footswitch mode are yours to author; the others show what the unit has assigned, read-only. EXP at the end is the expression pedal, two states, A and B, saved with the rig. Scenes save with the rig and Push writes them, keeping the pad numbers a Hardware Assign gave them.
-
07
Push to device
Top right. It opens a sheet with one button, Push to device…. Press it and the app checks the unit (Checking the device…); if something is wrong it says Not ready to push with each reason on its own line, and offers Check again or Cancel. If the unit is ready it goes straight on: a new empty rig is started on the unit, the blocks are filled in one at a time, it is saved as a new preset and every parameter is read back. It is saved as ##HRB Name, or ##HRB Name 2 if that is taken; nothing on the unit is ever overwritten. On the Mac there is nothing to confirm. Windows asks once, Push “Name” to your device as “##HRB Name”?, then Yes, push it.
When it lands the sheet says “Name” is on your device and how many parameters were written and read back correctly, and the window goes to Device, because that is where the next thing you do with it happens. A read-back that disagrees stays on screen with the slots that differ, so a half-written rig is never waved through. A preview cannot be pushed; adopt it first.
-
08
Device
Device in the nav swaps the canvas for the unit's own Remote Editor, live, inside the window; the bar above it says the one thing to know, Knobs here write to the unit immediately. Turn a knob here and the hardware moves. Back to the rail, Escape, or any other nav item brings the rail back. Reload and Open in browser are there for when the editor itself misbehaves. Device only exists with the unit on the network, as do captures, the push, Device rigs and the live pads; Build, the library, History and Setup work with it off.
-
09
Rigs: yours, and the unit's
Two lists. Rigs is the app's own library, each row with its block count; click one and it is on the rail, back in Build. Device rigs below it is the unit's own list, read live off the hardware in the unit's own order, with a count and a reload arrow. Clicking a row there loads that rig on the unit and reads its chain onto the rail: the click is the instruction, and it changes what the unit is playing. Listing changes nothing. Neither list opens anything while a preview is showing or a build is running.
-
10
History
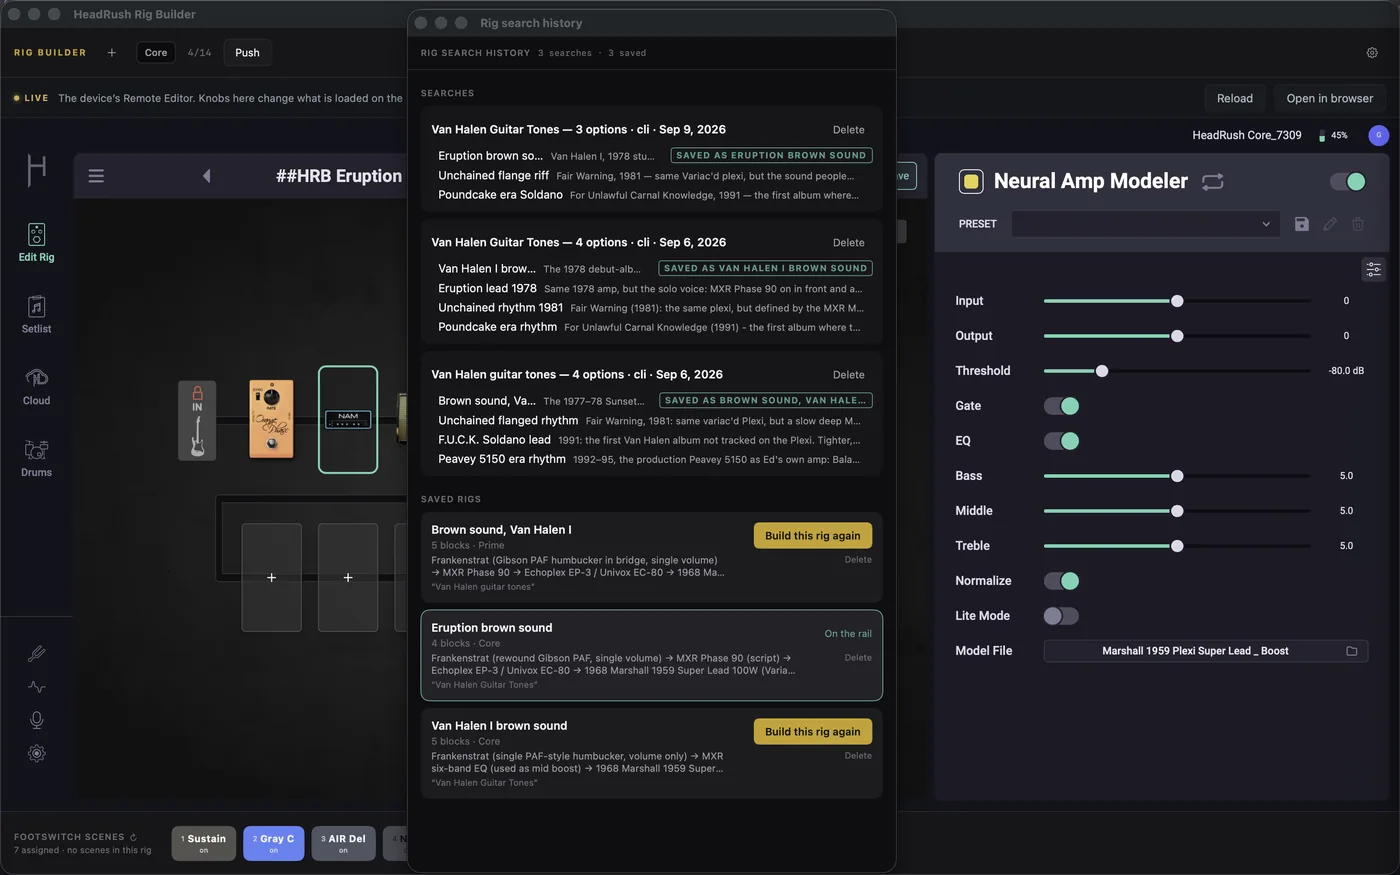
The History panel has one button, Open history (⌘Y), and it opens a window of its own, so you can read it while working on a rig. Searches lists every search you have run. The ones that found rigs carry every option each produced - click one to preview it on the rail, and an option you kept says saved as and the name. Since 0.9.1 the ones that found nothing are kept too, under found nothing, with the reason the search gave for declining; a refusal is usually saying something about the question. Saved rigs lists the library with Build this rig again, which puts that rig back on the rail. Each has a Delete: deleting a search takes its options, and rigs saved from it stay; deleting a rig asks first, and ⌘Z in the main window brings it back.
-
11
Setup, and Settings
Setup is the subset of Settings you need while working. Target device: the Chassis, Prime, Core or Flex Prime, and under it the hostname the app is reaching, headrushcore.local for a Core. Backend: the seven tone-search backends. Theme: Mint or Black Gold.
The full Settings window (⌘, on the Mac; Settings in {{ electronApps }}) adds what is set once for the hardware: an Other… hostname for a second unit of the same model, Check connection, which names what answered, Test backend, which probes the tone search without running one, the API keys ({{ keyStoresInline }}) with a Clear for each, and the snapshot of the unit's schema the app was built against.


| Space | Bypass or engage the picked block, unless you are typing. |
| Escape | Close a sheet; leave Device; leave a preview, in that order. |
| Return | In the Name field, rename the rig. |
| ⌘Z | Undo the last edit to the rig, including a scene or a deleted rig. |
| ⌘Y | Open the History window. |
| ⌘N | A new empty rig. |
| ⌘, | Settings. |
| Menus | Mac: HeadRush Rig Builder → Check for Updates…. Windows: File → Check for Updates…, and File → Open Data Folder for the library, settings and logs. |
Space and Escape are the same on Windows. The ⌘ shortcuts are the Mac's; on Windows the same actions are in the menus and on screen.
Questions worth answering
How does the app talk to my pedal?
The pedal's built-in Remote Editor is a web page served by the unit, and it works by calling an API the unit exposes on your network. The app talks to that same API directly, by the unit's mDNS name (headrushcore.local, headrushprime.local or headrushflexprime.local), with no account and no server of mine in between.
A push never touches an existing preset. The app starts a new empty rig on the unit, fills in the blocks one at a time, saves it as a new preset named ##HRB <your rig name>, and if that name is already taken adds a 2, 3, 4 and so on. Then it reads every parameter back and tells you if anything did not take.
The same API is how it reads the captures and impulse responses already on your unit, fetches the unit's own block pictures for the rail, reads your footswitch assignments, and lists the rigs on the unit. Tone3000 downloads run on the unit itself, with your own Tone3000 account. The Device tab is the real Remote Editor page loaded inside the app, so knobs there change the unit immediately, same as in a browser.
Does this need an internet connection?
For tone search, and for Check for Updates. The search goes to the AI backend you chose, and with web search on it verifies gear against real sources; the update check reads one small file from this site and nothing else. Pushing to the pedal is local-network only, and your library works offline.
What does it cost to run?
The app is free. On the default backend, searches run through the Claude CLI on the Claude subscription you already have, so there is no key to buy and no extra bill. On an API-key backend you pay your provider per request instead. An API key is not the same thing as that company's chat subscription. ChatGPT Plus does not include OpenAI API access, and a Claude or Gemini plan does not cover their APIs either: an API key is billed separately and a new one needs its own credit before it will answer anything. The three CLI backends, Claude, Codex and Grok, are the ones that ride a subscription you are already paying for.
Are my rigs or prompts uploaded anywhere?
No. There's no account, and no server of mine sits in the path. Search queries go to the backend you picked; rigs, settings and keys stay on your machine, with keys in {{ keyStores }}.
Will it overwrite rigs I already have?
No. A push always saves a new preset, named ##HRB <your rig name>, and if that name is already on the unit the new one gets a 2, 3, 4 on the end. Existing presets are never touched, and the app reads the new one back to prove it landed. The first question above has the whole mechanism.
Can it match a specific record?
The gear and broad settings for a well-known tone are well documented, and that part holds up. With web search on, every claim is tagged as confirmed, reported or inferred, with a source. The exact knob positions on anyone's amp are not documented anywhere, and your guitar, pickups and speakers are half the sound. Treat the result as somewhere sensible to start, then use your ears.
My unit isn't in the list.
Prime, Core and Flex Prime, which share the Core's engine, are the only units the app targets. Nothing is tuned or tested for anything else.
Anything I should know about my network?
The pedal's own API is unauthenticated, so anyone on the same network can read and write its state. That's the hardware, not this app. Keep the unit off shared and guest networks.